How I became a citizen of America: the process of naturalization from A to Z
What is the difference between a US citizen and just a green card immigrant? You can vote and the road is open to you without a visa to almost any country in the world, Andrey Boichuk writes in an article for Immigrant porada.

Фото: Depositphotos
For 11 years, I had no interest in making myself an American citizen. But somehow at dinner we talked with my wife and friends about the pros and cons of citizenship. In the morning the next day I realized that with US citizenship I would have more advantages than disadvantages.
In addition, my 2017 year ended with a green card. Therefore, I didn’t care what to pay money for: updating a green card or for citizenship.
Next, I will talk about the process of obtaining American citizenship. I have broken this process into 4 parts, since they are all special in their own way:
- filing an application,
- fingerprints,
- interview,
- oath.
Here are step by step what you need to do.
1. First a question for you: do you already live in the USA for 5 years with a green card? If so, then super: you have the right to apply for citizenship.
2. To do this, first of all, you need to fill out an application - Form N-400, you can download it here. The process is a bit long, but not hard. You need 1-2 hours to fill in everything, if you have all the information. In the video, I'll show you how to fill out an N-400 form.
3. After you fill out the application, you will need to print it. If you want to fill it out by hand, print out the application and fill it with only black pen and block letters.
4. Gather the necessary documents and papers before submitting the application:
- the statement itself (Form N-400);
- a copy (color only) of the front and back of your green card;
- 2 passport photos. They can be made at any pharmacy. By the way, on the back of the photo you need to write your name in pencil, as well as the Alien Number - this is the A# on your green card.
- personal check or money order for the application. This document will also need to write your Alien Number A #. How much to do? Every year they change the fee for the application, so for this link you can find the current fee just click on Filing fee.
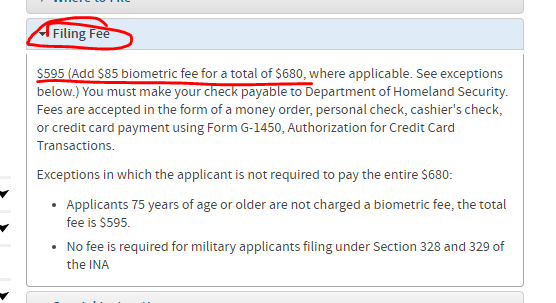
Photo by the author
After you have collected all you need, you must send these documents to the Immigration Service. By the way, I recommend sending by priority mail. It will cost $ 5-6, but so you will avoid the excitement that the letter will not come, because you will have a number by which you can track your envelope with documents.
Where to send the package?
Depends on which state you live in. The address can be found on this page by clicking Where to file and finding the state where you live. On the right will be the address where to send. For example, New York:
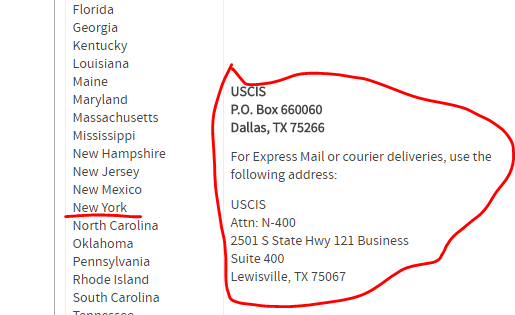
Photo by the author
I sent, and after 10 days I received such an SMS, where it was said that they received the documents and the case was opened:

Photo by the author
Handing over prints
Less than a month later, I went to the center, where they take fingerprints for American citizenship. Previously I received a letter in which the date, time and place were indicated where I should do it, and the necessary list of documents that relate to this procedure.
So, you need to take with you:
- confirmation letter with the time and date you received;
- your green card.
The letter indicated the time when I should have come: 11.00. However, knowing that time is written only for the organization of people, I went there to 9.30 in order to complete this procedure more quickly.
Having entered the center, I first went to the window where I presented my confirmation letter and green card. The employee gave me 2 pieces of paper: on the first one I only had to enter the application number, and on the second one I had to fill out a form, indicating the necessary information about myself.
When it was my turn, I received a booklet to prepare for the exam (by the way, later you need to take an exam to become an American citizen, but now they just provide preparatory material), my serial number and went to the waiting room. There is a large screen on which the numbers are displayed - you just watch and wait for your serial number to appear.
The use of telephones is prohibited here. Moreover, literally everything is prohibited, including writing letters or SMS messages. You can’t even hold the phone in your hands - they will make comments.
When you are called to the window where fingerprints are taken, they immediately ask: “Do you speak English?". You are then asked to sign, fingerprinted and photographed. This completes the procedure at this stage.
A little note. Better to be polite and smile to the person who takes your fingerprints. For a long time I will not explain why and why, but take my word for it.
The whole procedure took me about 1,5 hours, so it should be allocated to this case about 2 hours of time.
After fingerprints, wait for other emails with instructions on what to do next.
The Interview
In an interview, I went to the Immigration office in Manhattan. At the entrance, of course, you had to go through a metal detector, like at the airport.
Then I went up to the required floor, walked over to the window, which the guard pointed out to me, gave a letter with a statement. The woman with whom I spoke, typed something on the computer, gave me a letter and sent it to another window to get the number.
I took it and went to the waiting room, in which they simply shouted numbers. Here is how my number looked like:
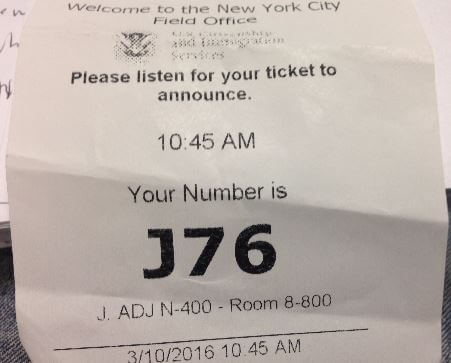
Photo by the author
By the way, they called out of order. All rooms were different. I do not know why and how they did it, but I want to warn you that they are calling to different numbers.
I waited for 2 hours.
Finally they shouted out my “lottery ticket” number. I went to the door and then followed the immigration officer. We went into the office, I didn’t sit down. Why? Because they didn't tell me to sit down. In such a situation, it is better to follow the commands.
I gave the number. Before I was allowed to sit down, I had to raise my right hand and confirm that I would tell the truth, the whole truth and nothing but the truth - just like in the movies! I did so, and then sat down.
The worker asked my last name, social security and year of birth. Then he explained that now there will be an exam, and later they will check my application, which I sent a long time ago. He asked me a series of questions that I easily answered. I thought it would be harder. Then the employee gave me a suggestion for me to read it out loud, and also asked me to write a sentence. "Washington was the first president".
After that, we began checking the application page by page. The employee asked me questions, I answered them, and he looked to see if everything was correct.
By the way, I learned how to find an answer to the question about the number of trips. It is worth doing for stamps in the passport, and I did the photos.
Next I had to sign applicationand then check and sign a leaflet with basic information. At the end, the worker said that the invitation to take the citizen’s oath would come by mail, and gave a piece of paper confirming that I had passed the exam.
The whole process lasted no more than 15 minutes.
What is the best way to prepare for the exam? What method works?
You will be given a book with all the questions and answers. I advise you to read everything first, then take 13 sheets of paper and cut them into 8 equal parts. You will have 104 leaflets. You can simply buy 104 solid cards.
On each card you need to write a question on one side and an answer on the other. Of course, there is also a phone application called flashcard, but it is better to write with a pen, because this way you better remember the information.
Read all the questions once a week, and then once a day for a week just before the exam. So you all remember perfectly. Everyone has his own method of memorization, but when it comes to questions and answers, the method flashcard turns out to be optimal.
Excitement, of course, was like before some kind of ordeal, but I was not so nervous. Therefore, do not draw yourself in my head something terrible to be afraid to go there. Everything is very simple and easy to do. Just prepare and listen to what they ask you.
Oath
My oath took place in Brooklyn on 8.30 in the morning. I came to such an important event earlier, in 7.50.
Entering the building, I immediately realized that it was worth getting in line for security check - like at the airport, here you have to empty everything from your pockets and put things on the conveyor, and go through the metal detector yourself. By the way, there was no need to take off your shoes. What was new to me was that I also had to hand over my phone. When I did this they gave me a number so I could pick up the phone when I left. By the way, you need to turn off your phone.
I climbed the 2 floor to the door of the hall where the oath was to take place. There was a queue, and when they asked me for an invitation to take the oath, I remembered that I had to fill it out. But it was easy, no more than 1-2 minutes.
Problem ...
It seems everything goes according to plan, and now only 8: 00. Suddenly a woman who works here and a few more people come up to me. They say: "Sorry, but you will not be able to take the oath." I widened my eyes and asked “Why?”. I was told that I was dressed not solemnly. It was impossible to come in jeans!
I had a five-second panic, and then I asked: “What should I do?”. I was advised to go to the store and buy pants. So I had to find a store in 8 in the morning, buy trousers and a shirt there, which I probably will never wear again. I did not change the shoes and was a fashionable guy in a shirt, trousers and sneakers. But honestly, then I didn’t care. The main thing that I could swear.
I came back and my clothes were now acceptable. I felt not very comfortable in trousers and sneakers, it seemed to me that the whole hall was watching me. But what can you do, beauty requires sacrifice.
So remember: when you go to your swearing-in ceremony, dress professionally or formally. No jeans. One girl in a denim skirt almost got kicked out, but she had a long coat that she put on so that no one else would notice that she was wearing denim. The main argument used against denim is that it used to be working class clothing.
In addition to clothes in front of the entrance to the hall, the woman checked if I filled out the invitation and invited me to enter the hall. It was a big room like my school gymnasium from my childhood, and maybe more, but everything was done from expensive materials. All the walls are wooden interspersed with marble, with photos of the most famous judges who worked there. They took turns in their chairs.
By the way, to make it easier for you to imagine how it looked, remember the court in American cinema, everything was exactly like that. When we sat down, everyone was given a package with useful information. There was:
1. Congratulations from the president:
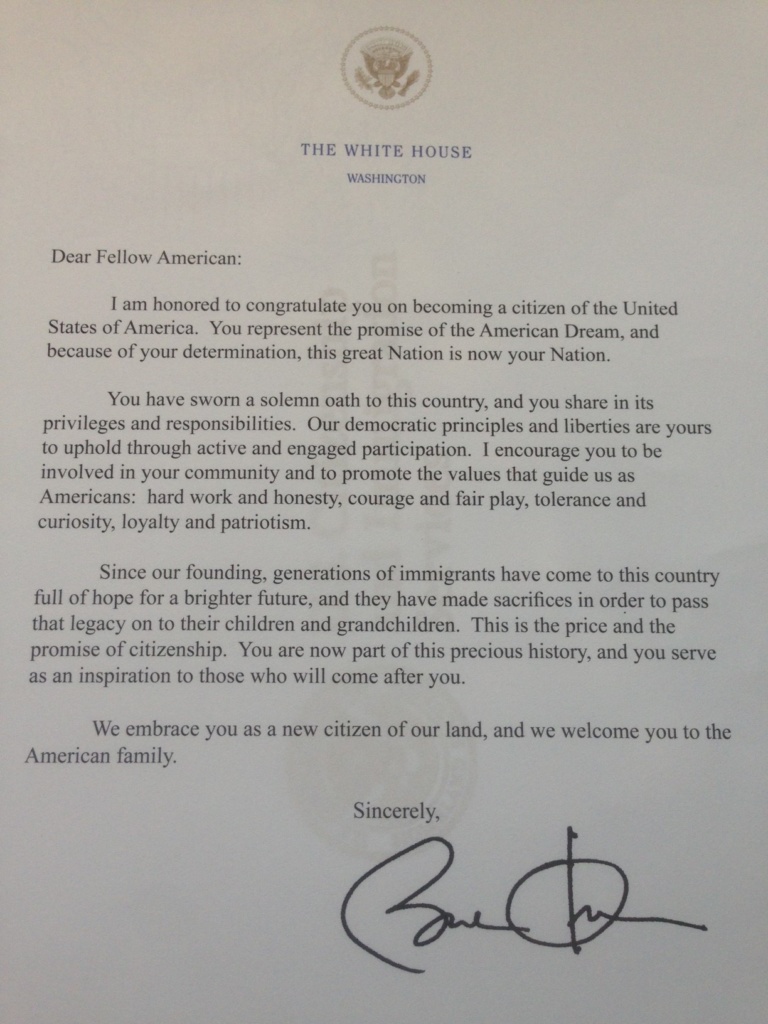
Photo by the author
2. Explanation of what to do next:
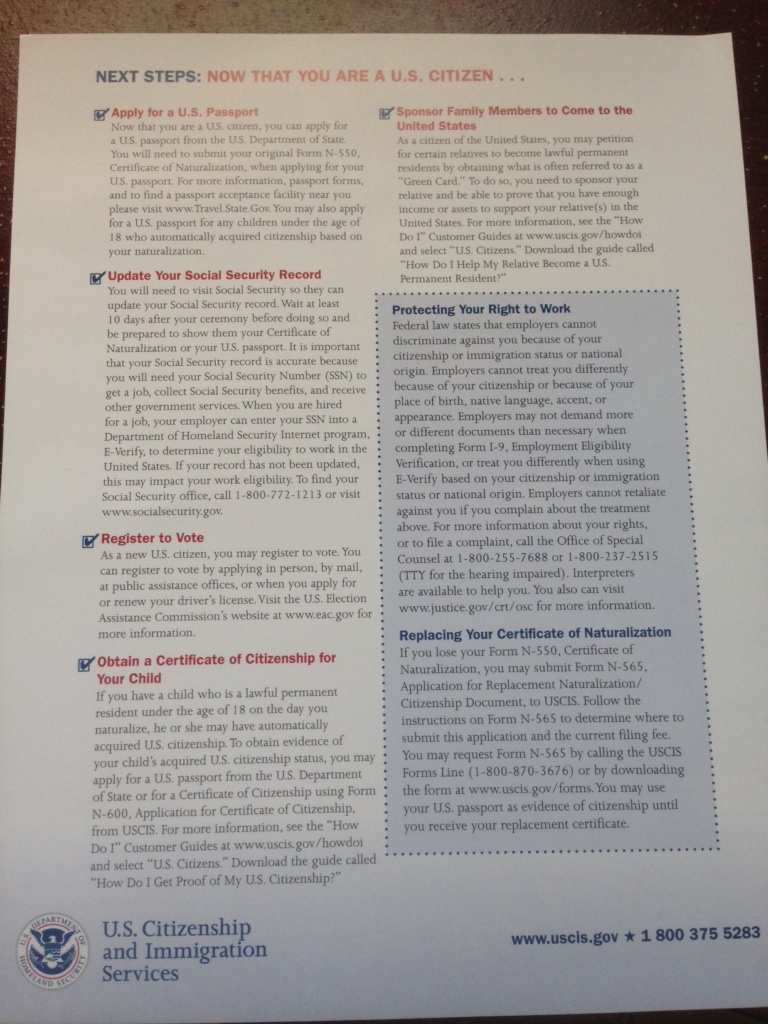
Photo by the author
3. A form to fill out a passport (by the way, if you have an entire day free, you can immediately go to the post office and go to the American passport).
4. Your civil rights:
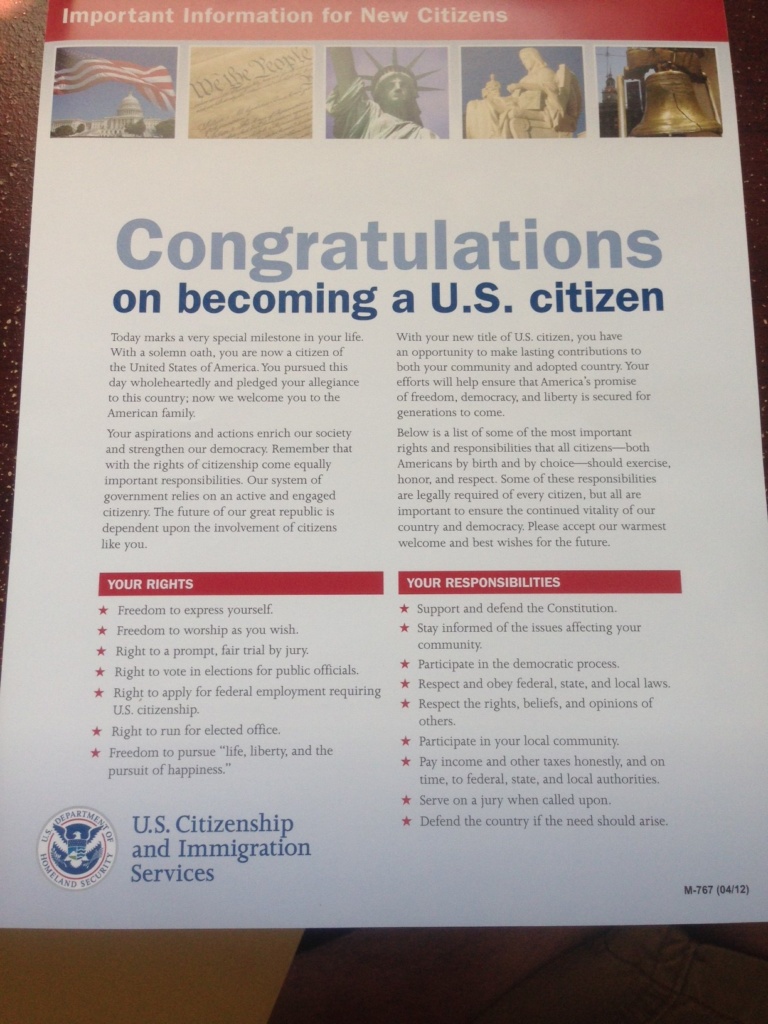
Photo by the author
5. The text of the oath. You will need it at the end when the judge comes out and you will read it all together.
6. And the folder of the citizen certificate itself.
We sat for a very long time, at least an hour, until the full hall was gathered. Then, in turn, row by row, we were called from one table to another.
At the first table, our green card and a letter indicating the time of the oath were taken from us. (appointment letter), wrote something on it and asked, something has changed since you had an interview. It means that something has changed in your marital or immigration status. Here you just need to say no, if nothing has changed.
Then they asked you if you have other immigration documents that you want to pass. If not, just say no. By the way, you do not need to take a Ukrainian foreign passport: it has nothing to do with American citizenship.
Next issue appointment letter and a handwritten three-digit number. With this, you need to go to another table and name this number (in English, of course). Then they give a certificate and ask if the first name, last name and date of birth are correct. Check this very carefully - it's important. If everything is correct, you just need to sign the certificate and then sit down in your seat.
After we sat down, for an hour we were handed out voting forms to fill out. Another 20 minutes explained how to do it. In fact, it was completely superfluous.
Then they explained to us what was in the packages that we were given when we entered and told us to take out the text of the oath.
We were told that the judge was coming. Then they closed the doors and asked for silence. We stood up when the judge entered, and began to read the text of the oath. Then they sat down. The judge greeted him, made a speech about 5 minutes and left.
Everything. Oath taken. Now the woman who sat at the table, where they had previously signed certificates, called everyone, we gave her our appointment letter, and she gave us a certificate of citizenship.
The whole procedure lasted about an hour or so 3. Therefore, if you plan to take time off at work, ask for at least a half day.
By the way, if you have never seen what a certificate looks like, you can see:
About the Author: Andrey Boichuk - founder Immigrant porada - Platform for Ukrainian immigrants in the United States. Cheerful husband beautiful wife and father of a joyful daughter.
This blog is translated from the Ukrainian language. The original article can be found on the website. "Іmmigrant Porada" (Ukrainian online advice platform for immigrants in the United States).
ForumDaily is not responsible for the content of blogs and may not share the views of the author.. If you want to become the author of the column, send your materials to [email protected]
Read also on ForumDaily:
How to track the delivery of your green card and other immigration documents
Nine types of people who shouldn't go to the USA
What vaccinations does the US Citizenship and Immigration Service require?
How to get US citizenship, if the spouse - American
How do immigrants protect themselves in case of domestic violence
Subscribe to ForumDaily on Google NewsDo you want more important and interesting news about life in the USA and immigration to America? — support us donate! Also subscribe to our page Facebook. Select the “Priority in display” option and read us first. Also, don't forget to subscribe to our РєР ° РЅР ° Р »РІ Telegram and Instagram- there is a lot of interesting things there. And join thousands of readers ForumDaily New York — there you will find a lot of interesting and positive information about life in the metropolis.


-
Where in the USA to buy the medicines we are used to: a list of pharmacies5330
-
Six ways to cut your medical bill in the US436
-
Joy to Work: 37 Jobs with Lowest Stress and Good Pay419
-
What folk remedies treat the common cold in the USA: what surprises our354
-
Personal experience: why immigrants have more chances of success in the USA than Americans290
-
Burger Arthritis: How Fast Food Triggers Autoimmune Diseases233
-
XNUMX stunning US lavender farms that will take you to French Provence220
-
Actions in a terrorist attack: how to survive yourself and help others6333
-
Where in the USA to buy the medicines we are used to: a list of pharmacies5330
-
How to hit the jackpot: tips from a man who won the lottery 7 times4898
-
Life after death: what happens to places of mass executions in the USA3883
-
How to start a profitable business in the USA, if you have only $ 203281
-
4 US Social Security Traps and How to Avoid Them1493
-
Street, avenue, boulevard or drive: how to understand the classification of US streets and roads1461